Benutzer-Werkzeuge
Inhaltsverzeichnis
IKEA LED Control
The aim of this project was to hack a cheap RGB LED Bar like the IKEA LED Bar so that you can adjust the RGB values through PC. On software side it was realized by C# and Arduino Code. But you could also do this with other programming languages instead of C#. What you need on hardware side is listed below.
Hardware
What you need
- Arduino Uno (or better) (28€)
- (IKEA DIODER) LED Bar (25€/m)
- Breadboard (3€)
- Cables for Breadboards
- ULN 2003 A (0,29€)
- Power supply 12V, min 1A (20€)
The Breadboard
Now you can plug in everything on the breadboard as showed in the picture below. Your external power supply should have 12V and 1A (if you use one set (1m). But you can use two sets in a row and then you need 2A and so on)
Thats how it looks like on a real breadboard (in the picture you can see an Arduino Mega and not an Uno)
On the LED Bar side you should use the cable that normally plugged in on the original color changer. The developers helped us a lot that they marked the RGB cables. ( _ _ = Red, __ = Green, x x x = Blue, text = Power)
Software
Arduino
Now your breadboard should be finished and the Arduino should be connected to your PC. In the next step we upload the following Arduino code to the Arduino (You can find the .ino file at the end of the article in the zip file).
 int red;
 int green;
 int blue;
 int rPin = 9;
 int gPin = 10;
 int bPin = 11;
 void setup()
 {
    Serial.begin(9600);
    int red = 0;
    int blue = 0;
    int green = 0;
 }
 void loop()
 {
    if (Serial.available()>=4)
    {
       if(Serial.read() == 0xff)
       {
          red = Serial.read();
          green= Serial.read();
          blue = Serial.read();
       }
    }
    analogWrite (rPin, red);
    analogWrite (gPin, green);
    analogWrite (bPin, blue);
 }
The code is waiting for byte values sended over the COM port and if it gets the value 255 (0xff) then the code knows the following sended bytes are the RGB values, because it could be that other programs also send values to COM ports so we use the 255 as a recognition byte. Afterwards it reads the RGB values sended as bytes and write it into the variables red, green and blue. At the end it sends this values to the LED Bar.
The LED Control program (C#)
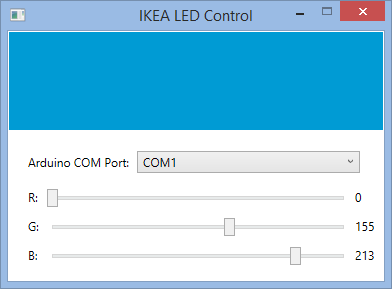
If everything is working fine you can now use my LED Control program for Windows („IKEA LED Control.exe“). You should know which COM Port is the port of your Arduino and select it in the list (If you don't know look at the options of the Arduino software or try each port). Now you can adjust the red, green and blue values of the LED bar.
Program and Code
Here's the zip file with all you need.
In the „IKEA LED Control“ folder you can find the whole C# code of the LED program. I've tried to comment the code very well but if there any questions on how it works you can send me an email daniel.immanuel.fink@uni-konstanz.de


